
How To Make Beats: Step-By-Step Beginner Guide
Jan 19, 2023
-
Tero Potila
Making beats starts with choosing your genre, picking basic drum sounds, and building a simple pattern on a step sequencer or drum roll. You can create your first beat today using free online tools, even if you have zero music production experience.
Learning how to make beats is really just about combining harmony, rhythm and melody into something that sounds good to your ears.
In my experience as a music producer and composer, there is no single right way to approach it.
As long as you can follow your intuition and stay in your flow, you can learn to finish pro-level beats.
It does take work to become a great producer, but going through the learning curve can be a fun process with the right guidance and attitude.
All that’s required is drive, effort and focus.
From the raw energy of classic hip hop beats to the atmospheric bounce of a modern trap, the heavy bass of UK drill, or the relaxing vibes of lo-fi, the creative process of making beats follows the same steps.
What Do You Need To Make A Beat?
Before you can get started working on your own beats, let’s check that you have the necessary tools.
The good news is, you don’t need expensive gear to get started! But there are some must-haves for your beat-making setup:
- Computer or Mobile Device: Early hip-hop beatmakers created tracks by manually looping vinyl breakbeats on turntables before adopting hardware like analog drum machines (e.g., Roland TR-808) and digital samplers (e.g., E-mu SP-1200, Akai MPC).
Today, most beats are programmed and sequenced directly on a computer, laptop, or smartphone.
You’ll also need an audio interface if you’d like to record any instruments or vocals using a microphone. - Digital Audio Workstation (DAW): The DAW is the centerpiece of music-making and is necessary to record, edit, mix, and master your beats. All modern DAWs nowadays are great; your choice mostly depends on which DAW best matches your workflow.
While some software requires expensive licenses and heavy computer processing power, an online DAW like Soundtrap lets you access your beat projects from anywhere and from any device. You just log into the studio from your browser and start adding instruments. - Step Sequencer: A step sequencer is a grid where you can plot out the pattern of your sounds. It is an easy way to program drum sounds, but can also be used for any instrument.
Soundtrap’s Patterns Beatmaker is a great online sequencer that lets you create drum grooves directly in your browser. - Samples, Loops Libraries and Virtual Instruments: Sampling is taking a pre-made sound and re-using it in a new song. Loops are pre-made drum patterns, melodies, or chord progressions that lay down a quick foundation.
Soundtrap offers sample packs with over 25,000 royalty-free loops, samples, and sounds that can be used for any genre.
Virtual instruments are also great for finding unique sounds without access to real-world instruments. Expensive equipment like a real full-size piano is no longer necessary in order to record a beautiful piano track. - MIDI Controller: While not a strict necessity, a physical MIDI keyboard makes beat-making much easier. These controllers usually include piano keys to play chords on, as well as pads to tap out drum patterns manually.
- Headphones and Speakers: Creating beats on your laptop speakers is not the best idea. Low-end sounds like bass and kick drums do not translate well on small speakers, making it hard to mix.
I highly recommend investing in a pair of good-quality studio headphones or even better, a set of studio monitors. If working on speakers, you should also consider adding some acoustic treatment to get your home studio sound dialed in.
How To Make Beats In 7 Steps
There is no set order or “the right way” to create a beat.
Some producers start by finding a sample they want to chop up, while others start with a heavy bass line.
My pro tip: Find an instrument, sound or sample that inspires you and follow that inspiration. I start just about all my tracks this way.
For example, one single chord on a cool-sounding piano instrument might trigger a vibe that then leads to a chord sequence that ends up being the backbone of the whole beat.
Wherever you choose to start, these steps will give you a reliable creative workflow:
1. Set Your Tempo and Vibe
The tempo and key shape the entire feel of your track before you place a single sound.
That’s why, as your first step, it’s a good idea to decide on the BPM (Beats Per Minute) based on your genre and the kind of energy you’re feeling.
You might aim for around 140 BPM for trap music, 90 BPM for boom bap, 70 to 80 BPM for R&B, or up to 170 BPM for drum and bass.
Also think about the vibe of the track: The major scale is a happier starting point because it sounds naturally pleasant, while minor scales are perfect for darker trap and drill beats.
2. Sequence Your Drum Pattern
Your drum track is the backbone of the beat, so give it real attention.
Open your step sequencer and start with a basic pattern: place a kick drum sound on beats 1 and 3, a snare drum or clap on beats 2 and 4, and use hi-hats to fill in the eighth notes.
From here, swap out default sounds so you end up with a unique drum kit that fits your vision.
Small timing shifts or velocity changes make a huge difference depending on the style and feel of your track. A drum beat that is too rigid can sound robotic.
If you need to nudge an element like a hi-hat slightly off the grid to add a human, bouncy feel, the easiest way to achieve this is to use the piano roll to edit the pattern instead.
The Piano Roll editor typically gives you more control over each individual hit.
3. Build Out Your Chord Progressions
Once your drums are grooving, develop the basic chords that will serve as the harmonic backdrop.
Open your piano roll and build a simple chord progression.
Three or four chords repeated over four bars is plenty for a first loop. Keep it simple and straightforward, as these initial chords will serve as a guideline for your melody later.
4. Top It Off With A Melody
The melody is where the beat comes alive. If you check out any hit song in popular music, you’ll definitely find a catchy and enticing topline melody.
Add melodic elements sparingly on top of your chords. One clear, memorable melodic line usually beats several complex ones competing for attention.
5. Create A Bass Line
The bass is the heart of a beat. Without it, your track will sound lifeless and thin.
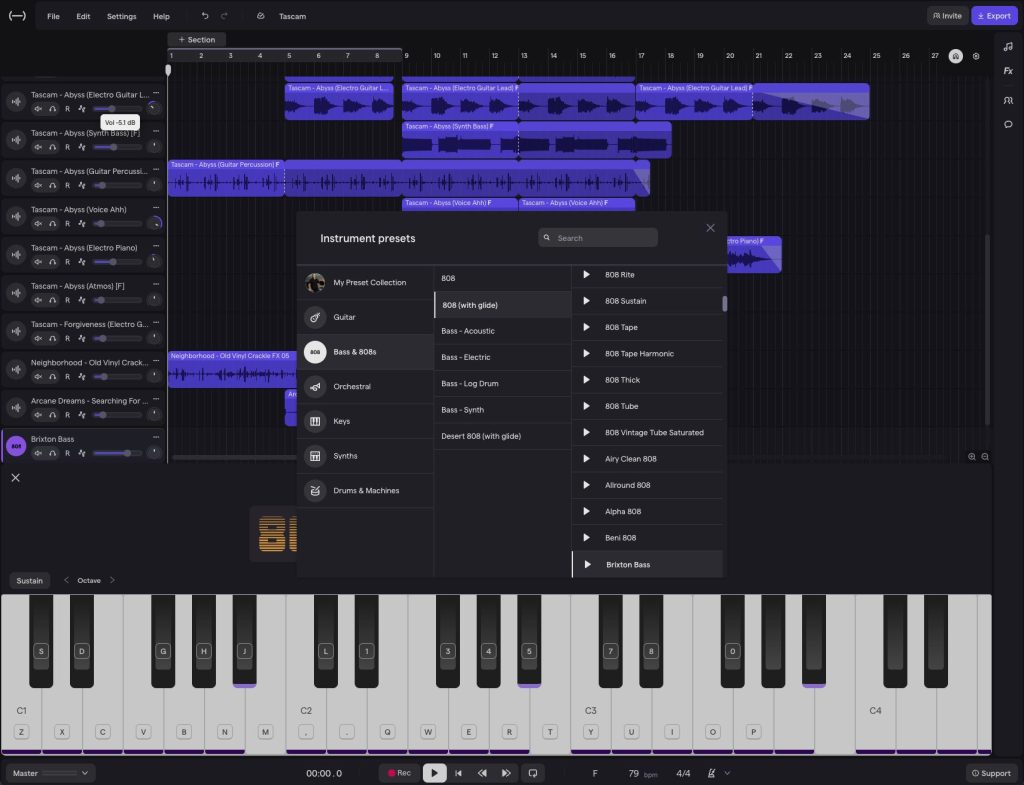
Your bass line, whether it is a pitch-bent 808 sub-bass (derived from the classic TR-808 kick sound), a synth bass, or a funky bass guitar, should lock in with your kick drum rather than compete with it.
Soundtrap Studio has thousands of instruments and presets to help you bring that heavy thump to your track.
6. Use Samples and Sound FX
Making beats is about keeping the listener hooked so they’ll keep wanting to hear more.
Using samples and sound effects is a great way to add interesting ear candy to your track.
Samples can range from entire sections of old soul records to just a single breath from a vocalist. Sound effects can be anything from a vinyl crackle to a police siren.
Incorporating atmospheric samples and sound effects into the background can be a great way to add more depth and texture.
7. Arrange Your Song Structure
Once you have a solid loop, it’s time to turn it into a complete song by mapping out where sections begin and end on your timeline.
Work on slightly changing some of the loops throughout the song to keep the music sounding interesting.
It’s all about adding that human element to the music, keeping the listener guessing and bringing in new, unexpected ear candy that keeps your track interesting.
Bring elements in your arrangement in and out at key points to build energy.
Here’s a basic layout for a solid song structure:
- Intro (2 to 4 bars): Stripped-down elements to set the mood.
- Verse (8 bars): Pull back some elements to leave room for an artist to rap or sing.
- Hook or Chorus (8 bars): Bring in all your instruments and your main melody.
- Verse 2 (8 bars): Pull back from the chorus energy, but with slightly elevated energy compared to the first verse.
- Chorus 2 (8 bars): Bring in all your instruments again, with some additional energy that helps lift this chorus even higher than the first.
- Bridge (8 bars): Introduce some new information in the lyrics, and something fresh in the music so it’ll perfectly lead to the final chorus. Often, a breakdown (stripped down instrumentation, for eample no drums) at the end of the bridge works well.
- Chorus 3 (8 to 16 bars): Time to bring it all in again, with the highest energy point of the song.
Keep in mind that the above structure is not set in stone. Experiment with what feels right and go with your gut feeling.
The verse-chorus-verse-chorus structure is nowadays so common that music fans have gotten used to digesting music in that format. It’s most likely going to give your song the best chances of becoming a hit.
The bridge, also referred to as the middle eight, is optional. If your song works well without the breakdown and chorus 3, then you could easily make the second chorus wrap up the song.
The length of each section is also up to you to determine. Go with what feels natural and gives the song just the right balance and opportunity to build up energy so the choruses can hit hard.
My biggest tip when it comes to song structure: Be sure that the song truly grabs the listener within the first few seconds.
Your track will be competing for attention among all the new music released every day.
Turn Your Loop Into A Finished Track
Once your sections are mapped out, it is time to focus on the mixing process. This is where individual tracks start to feel like one cohesive song.
Shape Sounds and Balance Individual Parts
Mixing is too big of a topic to cover in detail here, but let’s go over the basics:
- Gain staging is your best friend. Get your track input levels and mix volume levels right before reaching for any plugins.
- Use EQ to carve out space for each element and prevent frequency masking, especially between the kick drum and bass line.
If you are layering multiple drums or bass sounds, check your polarity to ensure they are in phase and not canceling each other out. - Apply compression to individual tracks and group busses wherever you want to control and even out the dynamic range of an instrument or a group of tracks. Compression is also great for helping “glue” mix elements together.
- Use effects like reverb and delay to add depth and space to your mix.
- Automation is a crucial tool for adding movement and keeping the mix sounding interesting. For example, try slowly fading in a synth during the intro, adjusting a synth’s LFO filter from dark to bright in the end of the verse, or slightly turning up the volume of the hi-hats during the hook.
Use Reference Listening
Reference tracks are an invaluable tool and a great way to check your progress against professional standards. I highly recommend using them!
Pick two or three songs in your genre with a similar energy to your track. Listen for loudness, low-end weight, and how the drums punch through the mix.
Switch between your track and the reference track while mixing.
My Pro Tip: Be sure to match the volume of your mix and the reference track when switching between them, as human ears perceive louder as sounding better.
Using reference mixes as part of your mix workflow is a habit that can help you catch problems early, like a muddy low end or a snare that is too quiet.
How Do You Make Money Selling Beats?
Making a living from beat-making without finding artists to work with in person is definitely possible.
Many beat producers make great money leasing and selling beats online through platforms like Beatstars.
You can sign deals on tracks with publishers that will market them for film/TV sync placements.
Social media is also great for promoting your beats.
Just remember: There is no quick fix to becoming an amazing producer.
Developing real expertise requires hundreds of hours of deliberate practice and continual learning in the studio before you can expect consistent results.
Conclusion
Learning how to make high-quality beats takes time, discipline, patience, and plenty of practice.
My biggest advice for any music producer starting out is to focus on momentum rather than trying to make every single track a flawless masterpiece.
Your next step after finishing one track should be to start another, because each song you complete teaches you something new about arrangement, sound design, and mixing.
Take things one step at a time, trust your ears, and don’t be afraid to push your limits and make mistakes along the way.
About the author
Tero Potila is a professional music composer and producer. His career combining knowledge and experience from music, TV, film, ad, and game industries gives him a unique perspective that he shares through posts on teropotila.com.


