
Adding Realism To MIDI: Tips For Authentic Sound
Mar 22, 2026
-
Tero Potila
MIDI can sound robotic when it lacks the natural imperfections that make live performances feel alive. The secret to realistic MIDI isn’t just the gear; it’s all about ensuring your tracks include subtle variations in velocity, timing, and expression.
While high-quality virtual instruments help, your programming technique is what transforms a flat digital sequence into a believable performance.
I’ve spent most of my career working with MIDI in professional productions, and the difference between realistic and artificial-sounding tracks comes down to attention to detail.
If you’re recording MIDI takes into your DAW by performing the parts, it’s important not to over-quantize the life out of them.
You can also add realism by applying simple tweaks to timing and other ‘human’ properties. These adjustments can dramatically improve the overall sound.
Core Techniques for Adding Realism to MIDI
Programming Human Touch with Velocity and Timing
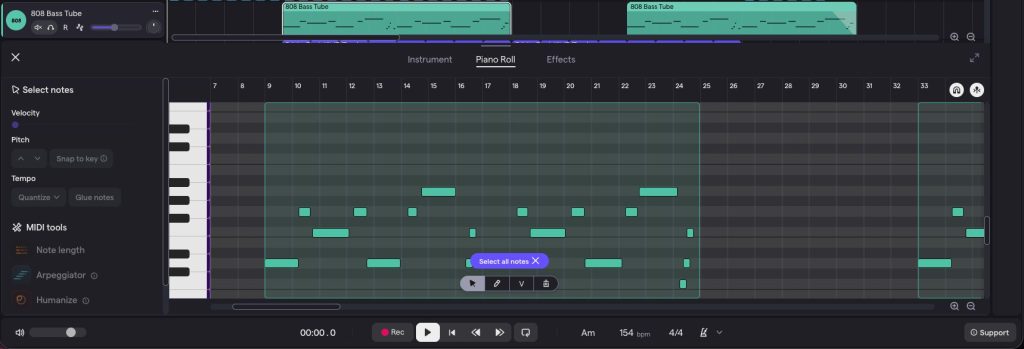
Adjust MIDI velocity and timing directly within the Soundtrap Piano Roll.
In my experience, the difference between a “demo” and a “pro” track happens in the Piano Roll window of your DAW. Every note should have varied velocity values.
A real pianist never hits keys with identical force, so your MIDI performance shouldn’t have uniform levels either.
- The Velocity Sweet Spot: Keep most passages between 65 and 95. Save 100+ for accents and 35-50 for ghost notes. For drums, alternate between strong hits on downbeats and softer fills in between.
- Nudge the Grid: Pull your MIDI notes slightly off the grid by 5-15ms to simulate human imperfection. Nudging notes forward creates urgency, while pushing them back creates a “laid-back” pocket. If you’re using Soundtrap, hold down the Alt/Option (or Ctrl/Cmd on some browsers) while dragging a note in the Piano Roll to bypass the snap-to-grid feature for precise, off-grid placement.
- Humanize Quantization: Apply quantization at 50-70% strength rather than 100% to maintain natural variation. In Soundtrap, you can find the Quantize settings by right-clicking your MIDI region; try the “1/16” or “1/8” settings at a lower strength to keep the pocket feeling “human.”
The key is to listen to the MIDI passage as if it were performed by a real human player on the instrument in question.
Try closing your eyes and imagining the performance as you listen. What would the player do differently? Where might the accents and quieter notes reflect their emotional delivery the closest?
Choosing Expressive Virtual Instruments and High-Quality Samples
The quality of the MIDI instruments you’re using directly determines how realistic your final mix will sound.
While technical specs like “velocity layers” matter, I always recommend choosing your instruments by listening to recordings rather than just relying on the numbers.
- Look for Round-Robins: This prevents the “machine gun effect” where repeated hits sound identical.
- Embrace Artifacts: Prioritize libraries that capture pedal noise, key releases, or mechanical clicks. These “flaws” are what make an instrument sound real.
Also, your MIDI keyboard should be velocity-sensitive to capture natural playing dynamics during recording.
In Soundtrap: Explore the “Acoustic” category in the Soundtrap instrument library. Instruments like the “Grand Piano” or “Clean Electric Guitar” are multi-sampled specifically to respond to the velocity changes we’re discussing here.
Layering Sounds and Using Multiple Tracks
Layering multiple MIDI tracks creates depth and complexity that single sounds can’t achieve on their own.
Try splitting your performance across two tracks, each using a slightly different-sounding version of the acoustic instrument you’re going for. This can sometimes work well for simulating the instrument’s natural inconsistencies.
For drum programming, layer high-quality drum samples with subtle room ambience or transient-enhanced versions on separate tracks.
EQ them differently; for example, with kick samples, you might use the low-end frequencies mostly from one sample and higher frequencies from the other.
With low-end elements, always check for phase conflicts between the samples.
You can do this by muting and unmuting one of the elements. If the sound changes thinner or, in general, lacks energy, you most likely have a phase issue, and you should reverse the phase for one of the tracks.
You can also layer the same MIDI notes with timing offsets of 10-20ms between tracks. This technique simulates the natural chorus effect that occurs when multiple musicians play together.
Utilizing Sustain Pedal and Articulations
The sustain pedal adds essential realism to keyboard and piano tracks by allowing notes to ring naturally, just like in a performance by a real piano player.
Program your sustain pedal data (MIDI CC64) to lift between phrases rather than holding it down continuously.
Real pianists use half-pedaling and rhythmic pedal changes to control resonance.
The same trick works here as I mentioned before: close your eyes and listen for spots in the performance where releasing and reapplying the pedal would sound natural.
You can also easily find sustain pedal points in the performance by looking for areas with a chord change or melody variation where notes from the previous phrase would conflict with the next section.
For other virtual instruments, articulation switching brings performances to life. String libraries offer legato, staccato, pizzicato, tremolo and many other articulations that should vary with musical context.
In many virtual instruments, these are mapped to key switches that you can trigger on your MIDI keyboard for quick access during recording.
Wind instruments benefit from breath controller data (CC2) that varies air pressure throughout phrases. Brass sections need fall-offs and doits at phrase endings.
These articulation details transform static digital instruments into expressive performances that respond as their acoustic counterparts do.
Advanced Tips for Realistic MIDI Performance
Adding Natural Variations and Ghost Notes
It’s all about injecting that human feel back into the performance.
Ghost Notes
Ghost notes are the quiet, in-between hits that give drum patterns breath and movement.
A real drummer constantly plays these softer articulations between main hits, typically at velocities between 30-50 compared to primary hits at 90-110.
For a snare pattern, it could look something like this:
Your main hit might land on beat 3 at a velocity of around 105, while ghost notes would appear at positions 2.3.5 and 3.2.75 with velocities of around 38 and 45.
This creates the micro-rhythms that make MIDI drums feel as if played by a live drummer, rather than programmed.
I’ve found that alternating between different articulations is another great trick that helps prevent the machine-gun effect. Try mapping ghost notes to rim clicks or softer stick positions.
The timbral variation is another sound quality to listen for. In many virtual instruments, this varies with velocity: the higher the velocity, the brighter and more energetic the note, just like real instruments.
Here are some of the key ghost note placements that often work well for drums:
- Hi-hat: Every other 16th note at 50-65 velocity
- Snare: Between main beats at 35-50 velocity
- Kick: Subtle double hits at 40-55 velocity before main hits
Be sure to randomize your note endpoints slightly as well. Real drummers don’t let cymbals ring for exactly the same duration every time.
In Soundtrap: Use the Patterns Beatmaker to quickly sketch the main hits, then click “Edit MIDI” to dive into the Piano Roll and add those lower-velocity ghost notes manually for a more professional feel.
Integrating Drum Plugins and Realistic Drum Sounds
Your choice of a drum plugin directly affects your final result.
Beyond standard velocity layers where a snare hit at velocity 80 triggers a different sample than one at 82, look for plugins that offer specific drum articulations.
The hi-hat, for instance, should have separate notes for closed, quarter-open, half-open, and fully open positions.
A drum fill sounds far more realistic when you transition naturally between these states, like moving from closed hats at velocity 75 to a half-open crash at velocity 95.
It may seem like a lot of work for minor details, but these variations give the drums an emotional and human edge.
Another thing to look for in a virtual drum instrument is bleed control between drum mics and adjustable humanization settings.
Both can add another layer of realism, which is vital for a realistic MIDI performance.
When setting your plugin’s humanization, start with a more subtle value and increase it until the drums sound just right.
Drum plugins often include built-in randomization for timing and velocity; most of the time, it’s a good idea to keep these under 8% to avoid sounding sloppy.
Advanced Mixing for Lifelike Depth
Even perfectly programmed MIDI won’t sound “real” without the acoustic imperfections of a physical space.
Precision EQ for Space
In a live room, instruments naturally occupy different sonic layers. Use EQ to mimic this separation:
- Drums: Cut low-end mud from hats (below 300Hz) and snares (below 100Hz). Boost 3–5kHz on snares for “snap” and 8–12kHz on cymbals for “air.”
- Melodic Instruments: For pianos or guitars, use a high-pass filter to clear space for the bass. A subtle boost at 2–4kHz can bring a flat MIDI synth to the front of the mix.
Dynamic “Glue” & Character
Compression and saturation add the “weight” and warmth often missing from digital productions:
- Parallel Compression: Apply to your drum or instrument bus at a 4:1 ratio (medium attack, fast release). This “glues” individual MIDI hits together into a single, cohesive performance.
- Saturation: Add 10–15% harmonic distortion or tape emulation. In the Soundtrap effects rack, the “Distortion” or “Overdrive” plugins used at very low settings can act as a great “Tape” substitute to add that warm, non-linear grit to your MIDI tracks.
- Stereo Width: Use subtle widening on mid-range frequencies for pads and pianos to create dimensional space that flat MIDI can’t achieve alone.
Room Ambience & Depth
To fix a “dry” MIDI sound, use varying reverb textures to create a 3D soundstage:
- Drums: Use short decays for punch (0.8–1.2s for snares) and longer decays for overheads (1.5–2.5s) to simulate room height.
- Strings & Keys: Use a lush hall reverb (2.0s+) with a pre-delay of 20–40ms. This separates the “strike” of the note from the wash of the room.
Conclusion
Throughout my career, I’ve found that the secret to a great production isn’t necessarily having the most expensive gear; it’s all about how much care you put into the performance.
While the convenience of digital tools is unmatched, adding realism to MIDI is ultimately an exercise in empathy.
You have to step into the shoes of the musician you’re simulating and ask: Where would they breathe? Where would their hands feel tired?
There are no “perfect” settings, so don’t be afraid to break the rules and stay open-minded as you experiment with these techniques.
Close your eyes, listen for the vibe, and trust your ears to tell you when your MIDI finally sounds like music.
Frequently Asked Questions
Why does my MIDI sound robotic or fake?
MIDI often sounds robotic because it is mathematically perfect. In a real performance, a musician never hits a note at the exact same millisecond or with the exact same pressure twice. Realism comes from micro-imperfections in timing and velocity that break up the digital grid.
What is the Machine Gun Effect in MIDI programming?
The machine gun effect occurs when a rapid succession of notes (like a snare roll or a fast piano run) triggers the exact same sample at the exact same volume. To fix this, use instruments with round-robin samples and manually vary the velocity of each hitting note to mimic a human hand.
Should I always quantize my MIDI tracks to 100%?
Strict 100% quantization is the fastest way to lose the groove of a track. Instead, try using iterative quantization or setting your quantization strength to 50–70%. This pulls the notes closer to the beat so they stay in time, but leaves enough human error to keep the track feeling natural.
How do Ghost Notes improve a MIDI drum pattern?
Ghost notes are very quiet, rhythmic “filler” hits, usually on a snare or hi-hat, that sit between the main backbeat. By programming these at a significantly lower velocity (around 30–45), you simulate the natural bounce of a drummer’s sticks, adding a 3D depth to a 2D digital loop.
How does reverb help MIDI sound like a real instrument?
In the real world, we never hear an instrument in total isolation; we hear the instrument plus the room’s reflections. Adding a subtle Room or Plate reverb with a short decay (under 1.5s) creates a sense of physical space, placing your dry MIDI samples into a believable acoustic environment.
About the author
Tero Potila is a professional music composer and producer. His career combining knowledge and experience from music, TV, film, ad, and game industries gives him a unique perspective that he shares through posts on teropotila.com.


